Happy Dots – Skirt refashion #2

22 04 2012

Well, I did it!  I finished spring top #3 before the deadline of 8 p.m. tonight. 

IMG_5619

Of course, today is gray and rainy, so the pictures are not the best, but what really matters is making a top that I think is super cute, and pulling off some pattern alterations that make this latest Sorbetto completely different from my first two Sorbettos. Like I mentioned last time, I thought this fabric would look cute in a Simplicity pattern that I have, but it’s in storage, so I can’t even tell you the number!  Necessity is the mother of invention, so what I did was cut a yoke off the Sorbetto, remove the pleat from that piece, and add 1/2” seam allowance at my new seam.  Then for the bottom front piece, I gathered the extra fabric across the middle half, choosing endpoints that I thought looked good. 

IMG_5640

I ended up omitting the dart because the fabric is really thin and I thought the dart would show through to the right side, plus with the gathers here, it is sort of unnecessary.  I mention this because it meant that my armholes did not line up; if you try this, omit the dart from the pattern before you cut the fabric!

As far as construction, I did it the way my Simplicity top suggests.  Briefly,

  1. Finish the neck seam on the back piece with bias facing.
  2. Cut 2 yoke pieces and sew them together at the neckline, right sides together.
  3. Turn inside out and press.  Optionally, stitch the seam down to the back side; this keeps it in place and makes the neckline lie flat.
  4. Sandwich the shoulder seam of the back piece between the 2 pieces of the yoke, right sides together.  This is spatial reasoning at its finest.  When turned right side, out, the whole seam is enclosed; it’s the awesomest seam finish ever.  It’s really hard to describe it; I wish I’d taken a picture!
  5. Gather the lower front piece to fit the yoke.  Match RST with the front piece of the yoke and sew. 
  6. Press the back side of the yoke under 1/2” so it will sandwich the seam you just made.  Pin in place and topstitch from the front, making sure to catch the back piece also, and making sure the seam is pressed upward so it becomes enclosed. 
  7. Sew side seams and it’s done!

Although you can’t see it in the pictures, the cool thing about this shirt is the way there are no exposed seams anywhere, except the sides.  Well-finished seams make for a really professional-looking garment!  You can’t see it when it’s being worn, but as the wearer, you notice it every time you put it on.  It’s not a fitted style of shirt, but this fabric is so breezy that I think it makes for a nicely draped top. 

2012 04 April9

This fabric is so lightweight it is like wearing nothing at all.  The total opposite of my sackcloth linen shirt!  It will be perfect for those hot summer days we get here in Rochest…wait.  We don’t really get any.  But it’ll be perfect for those steamy Seatt…no.  Not there either.  Good thing it looks nice with a cardigan!

IMG_5611

Please excuse the freshly showered look… this is what happens when you wait till the last minute!


Skirt to top, refashion #1

20 04 2012

We’re back at home now, in the land of neat and tidy living.  Here where I have done ridiculous things like line my books up by color.

IMG_5591

I saw it online, and it looks pretty, right?  Normally I have a library-esque system where fiction is on one side and non-fiction, grouped by subject, on the other side.  But as they say, the way you show a house is not the way you live in it.  So true!  This is not me at all but I have to admit I kind of like it.

Anyway, back up in NY we have thrift shops on every corner, a luxury (haha!  just saw the irony there) that doesn’t exist down where my parents are.  So, needing shoes for BB and still having the sewing bug (sewing really begets more sewing), I looked around the shop while the boys played with cars.  I didn’t find any good tops to refashion but I did find this skirt that really called out to me; it’s linen, which as I mentioned last time I am very fond of, and it had this funky embroidery.

IMG_5588

Now, when cut apart and pressed it was barely, barely big enough to fit the pattern, again the Colette Sorbetto, without the length added (which was OK because it already has a hem), and without the pleat.  I cut it out and put it together and found it surprisingly baggy.  I guess this fabric is quite a bit stiffer than the last one so it didn’t drape at all, just stuck out like a big hoop skirt.  I ended up taking the sides in about 0.5” each and adding a seam in the back, about 0.5” at the top and increasing to about 2” at the bottom, so a pretty substantial modification.  This closed up both the neck and arm openings, so instead of doing a bias facing, which eats up 1/4”, I pressed my tape to be a double fold bias and applied it to the openings that way.  No hope of eking out sleeves this time!  I am really happy with the final product though.

IMG_5606-001

It fits just perfectly!  On the back you can see the seam I added:

IMG_5609

It was unfortunate because this is a really noticeable pattern to stick a seam into!  But it had to be done.  Now, the skirt this came from was fully lined, and after wearing this I can see why – it is super, duper, mega scratchy.  I had a linen blend sling awhile back that eventually gave way to softness and I hope it happens for this fabric too, because right now I kind of feel like some medieval peasant wearing a burlap sack (albeit a pretty one).  The skirt was dry clean only but I hand-washed it and I think I will take my chances with the washer and dryer in the hopes that the fibers can be scrubbed and spun into submission.

The #1 in the title is because I found another skirt, which is now cut apart and pressed and ready to be made into a shirt.

IMG_5590

I actually have a pattern that I thought would be just perfect, I made this muslin of it last year just after the spring top sewalong…

IMG_3651

…but it’s IN STORAGE!  Boo!  So it will probably become yet another Sorbetto, which is fine.  With all the possible variations (sleeves/sleeveless, pleat/no pleat/inverted pleat, etc.) plus the wildly different fabrics, it won’t end up looking like 3 of the same top, which is one of the best features of the pattern.  It’s a blank slate!  So, if I find the time, top #3 here I come!


Don’t forget to check out all the fun stuff going on in the spring top sewalong!


Time for spring tops!

14 04 2012

This year I had resigned myself to abstaining from the spring top sewalong fun, the annual bonanza of selfish spring sewing on Made by Rae.  Those who know me in real life know that we are in the process of trying to sell our house and move cross country, so (*sob*) I packed up my fabric and patterns and put them in storage, sold some off, sent a machine down to my parents’ house, and essentially tidied up my sewing area to be a table with a machine on it and nothing else.  It looks great, but I can’t really do anything with it!  (Like my spotless and empty kitchen, totally unusable!)  So the kids and I are down visiting my parents for a week, because they are on break and it’s impossible to keep things clean with them around.  I was getting a little bored in the evenings, you know, without all that cleaning to do, and I realized it was spring top time, and I had an older machine here… all I needed was some fabric and a pattern!  After poking around online, I decided on the free Colette Sorbetto pattern with the sleeves found here.  I went to Joann and found a linen/cotton blend fabric in a print I adored, just a scant 35” of it left on the bolt, and 2 evenings later, here is the result:

IMG_5553-001

I really like the shirt.  I’ve made several closure-less tops from wovens and it’s a well known fact that these are a little bit on the baggy side.  In order to be a pullover-type top instead of a button/zip style top, they need a good bit of ease.  I made a size 8 (my measurements ranged from size 6 in one part to 12 in another, so I just picked my RTW size and hoped for the best), and the sleeve pattern fit perfectly with it.  The shirt is a little baggy compared to a t-shirt, but it’s not the tent that I was worried it might be.  It is super comfy compared to the other woven shirts I’ve made.  The armholes are not binding and there is plenty of room across the shoulders to move.  I did decide to lengthen it, based on some comments I’d read, and I did this very scientifically by adding a paint chip where the pattern pieces joined, haha!  I did this front and back to ensure they would be the same size.  I hate shirts that are too short and this one is not, with a bit added in.  Oh, I also shortened the bust darts by about an inch, since they seemed long.  No picture of that, but you can be assured it was equally scientific.  That’s just how I roll. 

IMG_5578

I wore it all day today and was just in love.  It does get wrinkly, which I consider an endearing characteristic of linen more than a problem.  I was able to chase kids all over and I didn’t feel it was tight, or gaping, for that matter, and I love the softness and breathability of linen. On the neckline, I didn’t like the way the bias tape looked (neither did either of my critics), so I covered it with a cute trim that I picked up at Joann while I was fabric shopping without the kids (oh, the luxury!).  You can see it in the bottom left picture below.  It doesn’t show up in the other pictures but I think it adds a great touch to the shirt. 

2012 04 April7

So in the end, I managed to join in the sewing fun, and try out a new pattern that I will definitely make again with some of the fabric that’s wasting away in a storage locker.  I actually like this better than Simplicity 2599, which I bought last year for this same occasion (but didn’t actually make till the fall).  Plus I got to rummage through my mom’s old sewing box for needles and thread and I found these awesome patterns:

2012 04 April8

Too bad I am not bold enough to try the really retro look!


What became of Christmas – a very belated post

12 02 2012

January found our advent tree looking like this:

IMG_5216

Look closely and you will see that time stopped for us on December 22nd, when family rolled into town.  Follow that with a trip out of town and a bout of illness, and I’ve been away from the computer for a while!  So here is a quick rundown of what I managed to put together as far as handmade gifts.  For my sister, I made another buttercup bag:

IMG_0171 I was so happy with how it came out, and I think she was too!  The t-shirt flower is just attached with a pin, so it can be changed out if wanted.  The strap was an old belt; the lining an old shirt… I am making a slow but steady dent in my “to recycle” pile of old clothing.  Another one to add to that score: a scarf for my mom!

IMG_0048 I didn’t get a picture before I gave it to her, but here it is in action, on Christmas morning!  I made it using this tutorial, from an old cashmere sweater that she had given me to make into pants for the boys.  :)  Well, LB won’t wear “fuzzy pants”, so I found a different use for it!  If I find the time, I might just have to make one for myself….

For LB, I was running out of time, but I quickly put together an apron for him.  Not just any apron, this is an apron that matches mine and BB’s; it signifies his promotion to bona fide kitchen assistant!  He was, well, not overwhelmed when he opened it.  Not as exciting as the huge and wonderful toys he received.  But when the commotion died down, he was thrilled to don his apron and “do cooking”, as he calls it. 

IMG_5223 As an aside, the very first sewing pattern I ever bought was for an apron.  I can’t believe I spent the money on it!  I’ve made 3 now with no pattern, and it’s super easy.  The only thing I did differently for LB’s was make the neck band of elastic.  Toddler heads are so big!  Now we all have a matchy-matchy set of green linen aprons.  Yay!

For BB, I also didn’t have much time to make something, but I knew a LOT of lego was in our future, so I made a lego sack

IMG_0085 Not a great picture of it, but you can see the idea.  Toss the legos on the sack (the white circle), pull the strings, and voila!  The legos are contained in a sack.  It’s too bad I don’t have a picture of the outside; it’s a very cute flannel print with monsters.  The one thing I did differently than the tutorial was to put 2 buttonholes on each side, so that the rope can’t get pulled inside the casing.  It’s working out very well to contain the explosion of legos so far!

So, that’s a brief update from the domestic front.  If I have a chance, I have several other (more recent) projects to post!


KNIT-erviews!

9 01 2012

Made by Rae is hosting a series of interviews about knits, and she invited all us small-time folk to play along, so I thought I would join in!  These interviews are called (if you can’t guess from the title):

Haha!  I am just a self-taught seamstress, but I’ve learned a lot about knits as I go.  Most shirts I would buy to wear, either for me or the kids, are made of knits, so it makes sense to sew clothes from knits too.  I’ve made some shirts from wovens, but they are definitely not the ones I reach for first.  Knits are comfy, conform to your shape better without being too tight here and too baggy there… just all around a great kind of fabric to use for clothes.  So here you go:

1.  Did you ever fear knits?

No.  I was too inexperienced to know any better.  I was feeling like I had mastered diaper sewing (which is how I got into sewing in the first place), so I bought some knit fabric (online), and a shirt pattern (also online), and just went for it.  If you are familiar with knits, you might get a kick out of the fact that it was a rib knit and MAN! did I tear my hair out over that project.  I was more timid afterwards.

Awwww...

(This is the fabric, but I don’t have a picture of the original shirt.)

2.  If so, do you remember a specific turning point?

Well, once I got a serger, working with knits became a lot easier.  Using that same pattern, I can put together a shirt pretty quickly and with minimal swearing.  Mine was not that expensive, and if you’re halfway serious about sewing, a serger is a wonderful thing to have.  (More on this later.)

(My first serged t-shirts.  Not great, but not bad.)

3.  What types of projects do you typically sew with knits?

Well, all kinds of clothing, I guess.  Mostly shirts, but knits also make nice lightweight pants and shorts for kids.  I bought most of my knits intending to make fitted diapers, so there’s also that.

IMG_2012

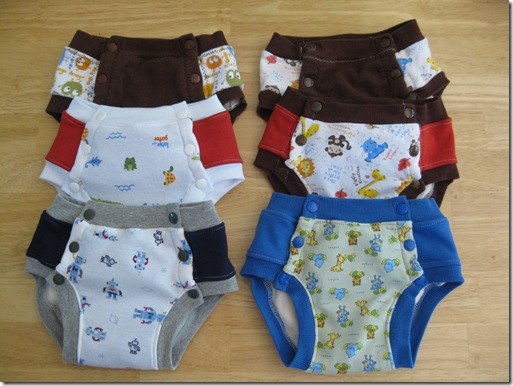
(Trainers—if undies weren’t so cheap to buy, I’d make those too.)

4.  Do you prefer sewing with knits or sewing with wovens?

Wovens, frankly.  Knits deserve their reputation.  They are stretchy and annoying to work with.  In comparison, wovens just slide like buttah under that presser foot, no problemo.  That said, I’ve made clothes with wovens and with knits and there’s no contest.  They may be harder to work with, but they are worth the effort if the result is something you will actually wear.  But I love sewing with wovens; they come in more varieties and it’s so fun to make a bag or a potholder… I’m just crazy like that.

2011 06 June3 
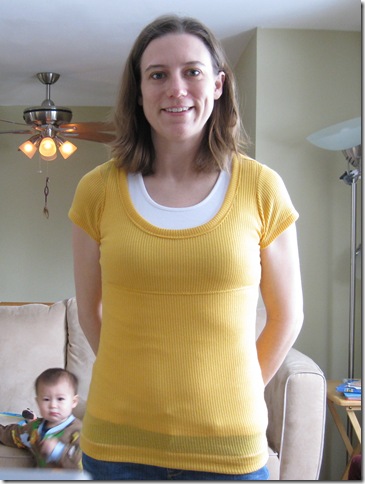
(Left: knit shirt.  Right: woven shirt.  The woven is tight in the armpits and makes me look pregnant.  Which one would you wear?  It was easier to sew, though.)

5.  Do you have a favorite type of knit (jersey, interlock, rib, etc.)?

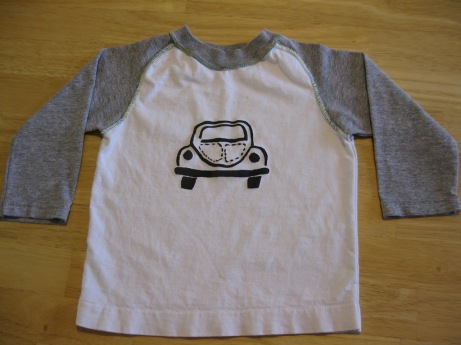
Probably jersey.  It’s lightweight and stretchy, yet not as super-ridiculously-stretchy as a rib knit.  It’s not that hard to sew.  Interlock is nice too, but is kind of heavyweight (IMO) for clothing.  But then, my kids get hot easily (and then walk around with their shirts tucked up in the armpits, and nobody wants to see that).  The blue shirt above is made from a jersey sheet.  There is a reason why t-shirts, the best form of clothing ever invented, are made from jersey!

02 February

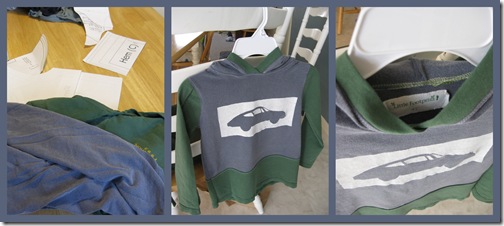
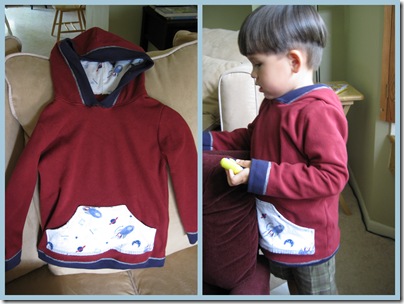
(Jersey hoodie made from old t-shirts.)

6.  Where do you usually buy your knits?

Looking back at my projects, I would say it’s a healthy mix of upcycled fabric (from my closet or from a thrift shop), some junk from Wal-mart, and some that I got online.  I’ve only bought from Nature’s Fabrics, a store that was a yahoo group and started out as diaper fabrics.  Well, they have a lot of that but also a lot of knits, because people make diapers from knits with cute prints.  They also have a lot of boy prints, which is awesome because they are hard to find.  (It was hard to even look at that link, because I am strictly no-buy right now.)

IMG_3394

(A shirt made from my Wal-Mart junk.)

7.  Any hints for buying knits online?

Not really, sorry.  The best I could say is learn well what jersey, interlock, and rib knit are, and their weights, then you’ll have a better idea of what is being sold.  I hate buying without being able to see and feel, so I don’t do it much.

8.  What brand/model machine do you use primarily for sewing knits?

I have a Brother XR-7700 that I got as a gift.  It works fine, I guess?  I don’t have much to compare it to.  It has a lot of stitches I never use, but it does have a stretch stitch that is handy for working with knits.

9.  Do you use a serger?  More/less/same amount as your machine when sewing with knits?

I do use a serger; I have the ever-popular Brother 1034-D (el cheapo) serger.  I did use it almost exclusively at first when sewing with knits.  It essentially has a walking foot, which is what makes knits feed through so evenly.  Once I got a machine with a walking foot, I often just use that and leave the seams unfinished.  It doesn’t look as nice, but personally, I think it’s more comfortable.  I still use the serger to attach cuffs or neck ribbing.  It’s just better for that.

(Shirt made with exposed serging—one thing that is fun to do with a serger.)

10.  What’s your default setting on your machine (stitch type/length/width)?

I can’t tell you exactly (because I don’t know, not because it’s a proprietary secret), but Cal Patch’s book recommended using a slight zig-zag, in other words, a stitch that is long and narrow, so it almost looks straight, but still has some give.  So for the seams, I would use a zig-zag stitch, probably about 2.0-2.5 long (not a long stitch, but longer than usual for a zig-zag) and about 1.0 wide or less.  For a hem, or attaching binding, I usually use a stretch straight stitch, which is best explained here on Omi Creates. (BTW, that tutorial is great just for learning how to do a binding, which is a great finish for necklines, cuffs, hems… it’s a very versatile finishing technique for knits!)

IMG_2368

(Another onesie made using that tutorial… too cute!)

11.  Walking foot, yay or nay?

YAY!  You cannot sew knits without it.  Just trust me.  It feeds the fabric through without stretching it…without one you have to go through this sorcery of stabilizers, spray starch, millions of pins… and yet none of that worked for me.  Get a walking foot if you don’t have one.  Now.  Stop reading and go shopping.

IMG_2612

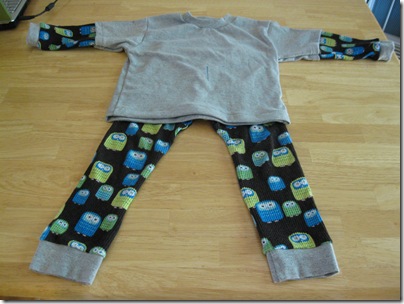
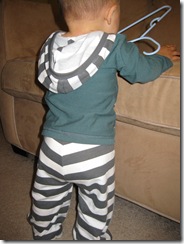
(PJ’s made with waffle-type thermal knit.  Don’t even think about using this fabric without a serger or a walking foot.  You will be reduced to tears.  Or maniacal laughter.)

12.  Double needle: your thoughts. 

Too much work.  I mean, it looks nice, I did it once, but it’s too much work.  I often think I will use it for hemming or for topstitching the neckline, but I just don’t want to bother to load another bobbin with matching thread, swap out the needle, etc., when I am so close to the end.

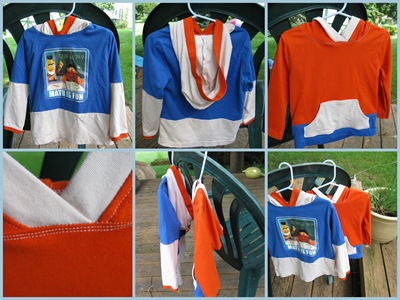
(Bottom left: you can see the twin needle at work.  Looks good, eh?)

13.  Do you have any tips or tricks for sewing with knits that you’ve found helpful?

First, get a walking foot.  After that, pretty much all you have to do is remember to not stretch your fabric while you sew.  If it’s a big project, keep it on the table so it doesn’t pull under its own weight.

August

(Hoodie made using binding a la 90-minute shirt.  Using binding that encases the edge of your garment (hem, sleeve, etc.) is a nice way to keep the knit from stretching because it doesn’t actually come in contact with either the presser foot or the feed dogs, so distortion is minimized.  Wow, that sounds geeky.)

14.  Anything else you want to say about knits?

That pretty well sums it up!  They are tricky at first, but if you try jersey first (100% cotton, none of this spandex stuff), or interlock, you’ll find it’s not so bad, and then you can move on to the more stretchy stuff (rib knit, thermal, spandex blends).  Sadly, nice prints are notoriously hard to come by, especially for adults.  Upcycling is usually the only way to find decent prints.  It’s so sad to walk into a store and see walls brimming with quilting cottons, but in knits you get to choose from puppies and fire trucks.  Ultimately though, for clothes, I’d say it’s knits all the way!  Hope you find some tips from this fun series!  I know I’m feeling inspired (after the holiday madness) to try out some new patterns.

IMG_2638IMG_2640

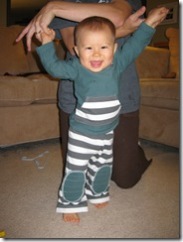
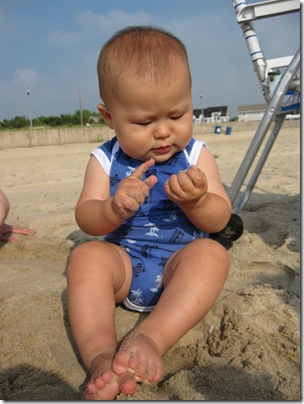
(Little does he know how silly he looks.  Isn’t it fun to make clothes for your kids?)

So check out the rest of the KNIT-erviews, and see if you get inspired to make something new!


Buttercup Bag

9 12 2011

I finally tried out the free buttercup bag pattern over at Made by Rae!  It’s been on my to-try list for ages.  I actually don’t have much in the way of cute quilting cotton, but I’m thinking of making one (or a few) for Christmas gifts, so I had to make a practice one for myself, right?  Field test it a bit?  🙂

IMG_5104

IMG_5105

I bought a remnant of brocade on a whim years ago, and used suedecloth for the lining.  I have a ton of it from my diaper-making days.  It came together pretty quickly, and I think it looks super cute, but am I alone in thinking it needs some interfacing?  As written, it’s made with quilting cotton for the outer and inner, and even with the thicker fabrics I used, it’s very floppy.  But, you don’t notice it much while you’re holding it, just when you set it down. 

“But you already have a purse,” says my husband.  “Hahahahaha!”  I say.  Now I have 2. 


Wrapping with fabric

2 12 2011

Yesterday we unpacked all our Christmas decorations, and lo an behold, I had bought a bunch of stuff on clearance last year after Christmas that I had forgotten about completely!  Sadly, this included a gingerbread house, so we won’t be making our own this year, but truth be told, I’m not that heartbroken about it.  I have everything I need in a box!  Waiting in the laundry room!  It’s like an early Christmas present.  Anyway, I also had some fabric; last year I had this plan of making reusable gift bags that we could use to wrap gifts.  But today I had this even better idea, so simple, yet I haven’t seen it out there (I’m sure it is somewhere, but I haven’t come across it), so I’m sharing it here.  Instead of a bag, I made a square (well, it came out 20” x 21”, but it’s pretty close) of fabric with serged edges (No serger?  Hemming would work just fine.)  Then I scrounged up a ribbon to go with it. 

IMG_5092

Now, I’m planning to do a book a day, and thankfully the order from Scholastic arrived yesterday, so we are set!  I feel like the wrapping is probably pretty self-explanatory but I put together some instructions so you can see how it works. 

2011 12 December

Basically, just put the book on the square (diagonally), fold in 2 sides, fold up the bottom and the top, tucking in any extra fabric.  Slip the ribbon underneath, center it, bring the sides up and twist in the center.  At this point, flip it over, then bring in the sides and tie a bow.  Done!  The ribbon holds the wrapping in place really well.  After today I will put out a new book under the tree every night, so that we can read it in the morning.  Better late than never, eh?

I think I will make a bunch of squares in different sizes for wrapping gifts this year.  I realize that this is more pricey than wrapping paper, but thinking of all the paper that’s thrown out on December 25th makes me cringe, so at least there will be a little less paper trash around here this year.  And, it’s possible that if they are used year after year, they will pay off in the long run  Now I’m not sure how Santa will wrap his gifts this year…


Turtleneck refashion

1 12 2011

This is an “easy project” that was about 3 months in the works.  Frankly the biggest obstacle to finishing it was that my sewing area was a total disaster; really, it was grim.  I avoided that mess entirely, which means I haven’t gotten much sewing done.  But look out world, I cleaned up that mess and I have a dozen UFOs (UnFinished Objects, for the uninitiated) that are gonna get done!

Anyway, I had looked around for ideas for a turtleneck refashion but not found anything I really liked, so I just did whatever.  I wish I had a before picture, but really, it was just like this but with a turtleneck on it, so it’s not hard to imagine.  The finished shirt:

IMG_5087IMG_5089

I goofed the neckline the first time around so I had to pick out the whole durn thing.  Once I restarted, it was finished very quickly.  Essentially, I just cut off the whole neck, seam included, then cut open the ribbing.  I had to join 2 pieces to fit the new, larger, less choke-y opening, so there are 2 seams on the back instead of just one, but if anyone notices that they are way too far into my personal space anyway.  Then for fun I added the flowers (or barnacles, as my dear husband called them) using this tutorial on presserfoot.  I didn’t go as big as she did because I didn’t have the same color and I thought it would be a bit much.  I love it, despite some continued mistakes in the neck (which I am NOT picking out again, if anyone sees the inside of the neckline they are WAY too in my space, thankyouverymuch).  It will never be as cool as the J Crew shirt it was styled after, but I think it’s a little better than the St. John’s Bay it started out as.  If anyone is interested I could make a tutorial; I have some more turtlenecks that I might need to transform now that I know it can be done.  Thanks for visiting!


Another spring top

10 10 2011

I finally got back to sewing last week after a summer hiatus.  I had all this great (cheap) fabric I bought back in May, and a stack of patterns to make some more spring/summer tops after the inspiration hit hard during Spring Top Week.  So… here it is, my spring top, just in time for winter, hahahahahaha!

2011 10 October

*sigh.*

It was my attempt to make a shirt like this one, and aside from the fact that I forgot to put in the ties, I thought it turned out pretty similar.  In the end, I convinced myself that it’s better not to have things hanging off my shirt anyway; really, that’s just an invitation to be grabbed at by little hands and dragged around like a dog on a leash.  :p

I had to alter the pattern (Simplicity 2599) pretty substantially.  I’d never made it before, and according to the measurements I should have made a size 14-18.  Well, I’m pretty solid, but come on!  My pattern only went up to 12, so I cut that one, and it was like a tent, so I made some alterations to bring it in at the waist. 

I waffle between liking it and thinking it looks like a clown shirt.  So, if you know me, you might or might not ever see me wear it out in public, I can’t decide.  Speaking of waffles, we made these sourdough waffles today and they were so good!  Mmmmmmmm……waffles…..


Cargo pants to purse: a tutorial

29 09 2011

A long time ago I mentally bookmarked this tutorial from noodlehead to make a messenger bag from a pair of cargo pants.  I even went to a thrift shop and bought a pair… and they sat, and sat, and sat down in the “to recycle” pile.  Note to self: mental bookmarks are not the way to go when your brain is like swiss cheese!  Anyway, I finally got around to it when I decided my old purse wasn’t working out.  I love it, but it’s so open on top that things fall out of it.  After losing my phone in the car a few times I decided to get serious about making a new purse.  So I went back to that tutorial, and realized it was too much like the scavenger hunt bag I made for BB in its construction (ie. too much work).  In light of that, I came up with a similar bag with a simpler construction.  (At least it was supposed to be simpler, until I decided to add pockets on every available surface, because really, what good is a purse that is not full of pockets?)  Here it is!

IMG_1842

IMG_4641

It has 2 pockets on the inside plus 2 carabiner loops, and 2 more pockets on the outside.  Here’s how I made it:

Gathering the materials:

  1. I cut out one big piece of the outer fabric and one of the lining.  They measured 25” x 11”, but it could be made any size.  In retrospect I think it should be shallower (less than 25” long would be better, I think).  The pocket from the cargo pants will end up on the outside of the bag.  IMG_4200
  2. I did some math.  I was going to sew up the sides to make the bag, using a 0.5” seam allowance, so the final width of the bag would be 10”.  The strap is going to be 2” wide, centered on the seam, so 1” on each side left an 8” opening for the flap.  I cut 2 pieces 8×10”, one of the lining and one of the outside, and rounded the corners.  (10” long was just how big I wanted it, not a calculated number.)IMG_4198
  3. I wanted a 2” wide strap, and the length I just eyeballed based on draping it over my shoulder – very scientific!  The easy way would be to cut pieces 3” wide of outer and lining, but I was running out of lining fabric so I cut a 2” wide piece of the lining fabric and a 4” wide piece of the outer fabric.  Also pictured: sort-of-matching bias tape used to trim the flap.  IMG_4201

Bag construction:

  1. Sewing the flap: put the wrong sides together, pin in place, and sew on the bias tape on three sides as shown:IMG_4212
  2. Constructing the strap: place inner and outer pieces right sides together and sew. IMG_4213 Then match up the other side to make a tube, wrong sides together, and sew.  IMG_4215 Turn the tube right side out, center the contrast fabric, and press.  IMG_4216 Topstitch along the edges. IMG_4217
  3. Optional: add pockets!  I cut out a cargo pocket from the pants (they had a lot of pockets) and just zig-zag stitched it onto the lining.  The only thing to make sure is that it’s right side up!IMG_4218 I added another scrap of cargo pant to the other side for another pocket (this one is oriented the other way, so it will be right side up in the end).  IMG_4219 And I sewed another scrap pocket onto the outside piece:IMG_4220
  4. Sew up the sides: put the right sides together for the outer piece and sew up the sides to make a pouch:IMG_4221 It doesn’t look like much, just an inside-out pouch!  Do the same thing for the lining.  (Oooh, I almost forgot, at this step I added two loops on the side of the lining.  I just stitched closed some of my bias tape and tucked it in the side seams, about 1.5” down from the top edge.  These are my carabiner loops which I love for holding keys and things when I don’t have pockets.)
  5. Square the corners: There may be better instructions out there but I’ll try: flatten the bottom corners as shown:IMG_4222 I wanted to make a 2” wide corner, so I made a line where it was 2”, then sewed along it.  Snip off corner.  Done!IMG_4223 Repeat on the other corner, and for both corners on the lining.
  6. Final assembly: With the outer part of the  bag right side out, pin the straps in place, right sides together.  Then pin the flap in place right sides together.  Finally, turn the lining inside out and shove everything into it, matching up side seams.  Pin all around.  Sew, leaving an opening to turn.  It’s pretty bulky, 3” should do it.  IMG_4224
  7. Turn right side out and if you did everything right in the previous step you have a purse!  Topstitch that opening closed and you are done.  Take a picture before you even wash off the marker!IMG_4232

I didn’t do a closure, I think the flap stays closed fine without any help.  I am in love with this pocket-laden, messenger-style, machine washable bag.  Only a mom could be so geeked out about this, but that outer cargo pocket (on the back) holds a diaper and wipes, so this is my diaper bag too!  Hope this inspires someone to make their own!

I am entering this in A Lemon Squeezy Home’s Purse week, check it out for some way better tutorials and substantially more fashionable entries!

Photobucket